Buyer: How do I create an RFP?
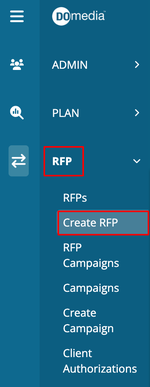
To create an RFP, click on the "RFP" and then click "Create RFP" on the left-hand side menu.
Create RFP – Step 1: Project Brief
This section contains the general request information. Note: required fields are marked by red asterisks (*)
- Campaign: Select the campaign you wish to associate with this RFP.
- You can also create and add a campaign from this page by clicking + Add Campaign
- Client (Code): Select the client you would like to associate with this RFP if it has not already been populated based on a campaign.
- Note: depending on permissions you may also be able to create a new client on the fly as well.
- Brand: This may also auto-populate based on the campaign but if not, you may select from the drop-down.
- Template: Select a template that controls the columns included in the grid for sellers to complete Note: A template must be created to be available for use in an RFP. If no template is selected, the DOmedia default template is used.
- RFP Title: Give your RFP a unique and descriptive name.
- Start Date & End Date: Designate the dates the media will need to be available.
- Response Due: The date/time by which vendors must respond to be considered.
The following settings and information are optional.
- Budget and Show Budget to Sellers: Enter a budget and indicate if you'd like to display it to vendors.
- Buyer-Only RFP: If you have your proposals and don't need to involve the vendors but want to take advantage of the perks of entering that data at the RFP stage, you can set the RFP to buyer-only and no sellers will be notified of the RFP. From there you can upload the proposal data and get the contracts generated with a few simple clicks!
- Open to other formats?: Indicate if you are okay with the sellers proposing formats other than what you specified you are interested in below in the RFP.
- Does this campaign have flights?: If yes, enter more details about those flights.
- I require a hold: Indicate if you need a hold placed on any proposed units and provide details related to the length of the hold.
- Use in-house Production?: This sets the RFP up for the in-house production workflow.
- Strict Validation?: If you are using the strict validation feature you will be able to indicate on an RFP by RFP basis if you want to enforce accuracy for certain columns of data (ex. market or format).
- Make Images Required?: Require vendors to submit images along with each unit they propose to an RFP. This feature must be configured in your account - reach out to your account manager if you'd like to enable it.
- Make Production Specifications Required?: Require vendors to submit production specification files along with each unit they propose to an RFP. This feature must be configured in your account - reach out to your account manager if you'd like to enable it.
- Objective and Strategy: Use these text boxes to further explain the goal of your campaign and any other information you think could help the seller understand your wants.
Markets and Locations:
- Market Type: Choose the type of market from the drop-down list.
- Available Markets: Select which markets are being considered by clicking the market name in the available market list.
- Locations: Use this text box to enter more specifics regarding the locations you are targeting.
Geopath Demographics: In this section, you can specify the demographic audiences (if any) being targeted. Also shown are optional settings to customize your pull further. Note: PopFacts will contain the most popular audiences. You will need to expand the Population to see the full list of available audiences.
Media Categories Considered: Here you can choose which advertising formats will be considered.
- RFP Attachments: Click Browse to select a file from your computer or network. Enter a description and be sure to click on the Add Attachment button.
- Target Location Lists: If you would like to include a Target Location List in your RFP, select one or more of your Target Location Lists by clicking on the desired list. Choosing a target location list on the RFP will allow you to include the Closest Location and Closest Location (mi) columns in your grid using step 2. These columns will automatically populate based on your target location list.
Finally, enter any Additional Information for the vendors or Internal Comments for your team.
Create RFP - Step 2: Build Template
On Step 2 you will find your template.
The columns on the left have been pulled in based on the template you selected on Step 1. If no template was selected on Step 1, the standard DOmedia columns will be listed. Columns on the right can be included in your grid as well.
- Including/Removing Columns: Step 2 displays the template with column headers that are included (on the left) and all available (on the right). You can include or remove the columns of your choosing by using the arrows. Note: Required columns cannot be removed.
- Arranging Columns: You can also click and drag the columns to arrange them in the order in which they will appear in the RFP grid. The closer to the top of the column when building the template, the closer to the left side of the grid it will appear.
- Showing/Hiding from Vendor: Use the drop-down menu to choose whether a column will be shown to the vendor or only visible for you to use.
- Previewing the template: Preview what the template will look like by clicking the "Preview Template" button found on the right side.
Custom Headers:
1. At the bottom of the Included Columns list, you can choose to add your own custom header by clicking Add Header.
2. After naming the column, you will want to choose to show or hide the column from vendors before clicking on the three dots to specify the data type (see below).
3. Data Types include Text, Number, Currency, Date, and Dropdown. The Data Type validation will not stop vendors from inputting data that does not match the requested data format, but it will highlight the cell red to call attention.
A couple more important things to note before moving on to Step 3:
- Based on the Geopath demographic audiences you selected in Step 1, you will see related columns in the Available Columns list (ex. PopFacts: Persons 18+ yrs 12wk Geopath In-Market Impressions). Select the desired columns to include.
- These columns will update with impressions or other calculations in real-time when the Update Geopath Data button is clicked after proposals are received.
- If you included a target location list in Step 1, you can also include the Closest Location and Closest Location (mi) columns in your grid which will also populate by the system once proposals are received. Once you are happy with your template, click Save For Later or Next to move on to the last step (Step 3).
Create RFP - Step 3: Recipient List
From Step 3 you will be selecting who on your team and at the vendor should receive communications related to this RFP. You have multiple options available for how to do so:
- Select from Vendors matching RFP Criteria: Use the dropdown to select vendors who meet the specific criteria in your RFP.
- Select from all DOmedia Vendors: Use the dropdown to select from all DOmedia vendors.
- Enter an Email Address: Manually enter a vendor's email address with this option.
- Add New Media Vendor: Use this option to add a new vendor, you can add their details, including contact information here. Once you have made your selection, you can simply complete the fields that populate and click on the "Add Vendor" button.
When selecting recipients from an existing vendor, if the contact you're looking for isn't there, you can invite them. Simply add the user's name and email address in the "Add Recipient" section and then make sure to click the Add Recipient button. They will then receive an email notification letting them know that they can claim their account.
Add Coworkers: By clicking "Add Coworkers," you'll have the ability to select anyone on your team who should receive all email notifications associated with the RFP process.
Once you have chosen all of the vendors you'd like to include (at least one), click Save For Later or Issue at the bottom of the page.
CONGRATULATIONS on issuing your RFP!
- Once issued, the seller reps included on the RFP will receive an email notification with a link to the RFP.
- You will receive an email notification once a seller has submitted anything for your review.
- The RFP can now be found in your dashboard by clicking RFPs under the RFP menu.